
A vivarium drainage system is a layer of coarse, open material under the soil, kept apart from it by a mesh barrier, so that water from misting and watering has somewhere to go besides your substrate. In a bioactive dart frog enclosure it is one of the few things you cannot easily fix later, so it is worth getting right while the tank is empty. Below you will find what the layer does, what to build it from, how deep to make it, how to install it and how to take water out of it once the viv is running.
TL;DR
- A drainage layer stops the lower substrate becoming waterlogged and gives excess water a reservoir below the root zone.
- Use a lightweight, porous, non-degrading material such as expanded clay balls, with a mesh barrier on top so soil cannot fall through.
- Make the layer deep enough to leave real headroom: one source suggests 1 to 4 inches (roughly 2.5 to 10 cm), scaled to the size of the enclosure.
- Fit a siphon tube during the build so you can draw water out later without disturbing anything.
- Watch the water level through the glass and empty the layer before it reaches the mesh.
Table of Contents
- What a drainage layer actually does
- Do dart frog vivariums need one?
- Choosing drainage materials
- How deep should the layer be?
- How to install a drainage layer
- Removing excess water
- Spotting a problem early
- Common drainage mistakes
- Closed enclosures, open systems and paludariums
- If you would rather start with a finished build
- Our view on drainage
- FAQ
- Sources
What a drainage layer actually does
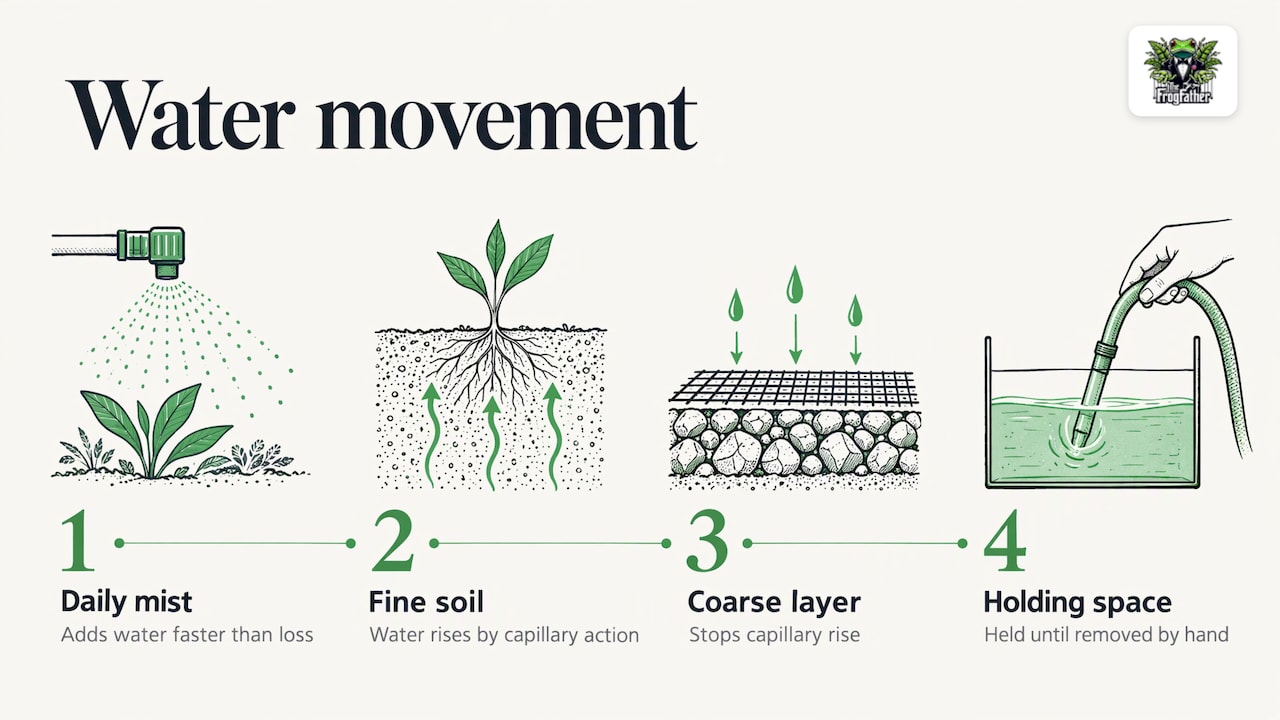
Misting a tropical enclosure daily puts water in faster than a sealed glass box can lose it. Without somewhere for it to go, it collects at the bottom of the soil. The result is dense, oxygen-poor, sour-smelling substrate where roots struggle and unwanted bacteria and fungi thrive.
The drainage layer solves this in a few ways. The Wisconsin Herpetological Association describes it as optional but recommended: it keeps the lower substrate from becoming waterlogged, helps air reach the soil above, and gives beneficial bacteria a home, where they help convert waste ammonia into nitrites and nitrates that plants can take up.
There is also a simple physical effect. Water rises through fine soil by capillary action, but it stops climbing at a sharp change to a coarse, open material. The void beneath the mesh therefore sets a ceiling on how wet the soil above can become. Your plant roots stay damp, not drowned.
That is why a drainage layer is not a drain. In a standard glass viv, the water stays in the tank. The layer is a holding space that keeps it out of the soil until you remove it.
Do dart frog vivariums need one?
For a planted, humid, bioactive enclosure that is misted regularly, we would build one. Dart frogs live in warm, wet conditions, and the substrate has to stay damp without turning to sludge. A drainage layer is the most dependable way of managing that in a closed tank.
We have gone into the question in more detail in our guide on whether dart frogs actually need a drainage layer. If you are still weighing up the whole build, the bioactive terrarium layers build order shows where drainage sits in the sequence.
It also helps to be clear about what the layer does not do. It does not make a viv self-managing. You still need to watch humidity, check water levels and tend the plants and cleanup crew. A drainage layer makes that routine calmer and more forgiving. It does not remove it.
Choosing drainage materials
The job is the same whatever you use: leave plenty of empty space for water, resist crushing, and never break down or rot. A good material is:
- Porous or open, so there is space for water and air.
- Inert, so it does not decay or alter the water chemistry.
- Light enough that a full-sized enclosure does not become a weight problem on your furniture.
- Clean, rinsed before use so dust does not clog the mesh.
Expanded clay balls
Expanded clay (often sold as LECA or hydroton) is the usual choice for good reason. The balls are round, light and full of tiny pores. They do not degrade in a wet tank, and they hold a little moisture that helps humidity. The Wisconsin article lists gravel, lava rock, porous clay balls and Growstone among suitable false-bottom materials.
Rinse them thoroughly before use. The dusty residue otherwise ends up on the mesh and the sides of the glass.
Gravel and lava rock
Gravel and lava rock work, but they are heavy and take up more of the volume with solid material. On a large tank that adds weight you may not want, and a heavier layer holds less water for the same depth. Lava rock can also have sharp edges, which matters when you are laying mesh over it.
Egg-crate and rigid grids
Plastic light-diffuser panel (egg crate) gives a hollow void with a flat top, which suits tight builds where depth is limited. It is stable and easy to cut to size. Its limit is that the void is a single open space, so the mesh on top must be well supported or it will sag under the soil.
How deep should the layer be?
Depth is not about hitting a magic figure. It is about headroom: how much water the layer can hold before it reaches the mesh. A shallow layer reaches the screen after very little water, so the soil above sits in standing water sooner. A layer that fills to the mesh is arguably worse than none, because the soil is then permanently saturated.
Published advice varies. The Wisconsin Herpetological Association suggests 1 to 4 inches of false-bottom material, which is roughly 2.5 to 10 cm. Use that as a range, then adapt it:
- Small enclosures have less height to spare, so you will sit near the lower end and keep a closer eye on the water level.
- Taller or larger enclosures can take a deeper layer, which gives you more time between water removals.
- Heavy misting or large water features call for more headroom than a lightly misted display.
Remember the layer takes space from your planting depth. A deep layer in a short tank leaves little room for soil, so plan the whole stack, not just the bottom. Our substrate and drainage guide walks through the layers together.
How to install a drainage layer
Build it in the order below with the enclosure empty, level and on its final stand.
1. Check the enclosure
Wipe the base clean and make sure the tank is sealed and level. If it is not level, water gathers at one end of the layer and the level reading through the glass is misleading.
2. Rinse and lay the material
Wash the drainage material until the water runs clear, then spread it evenly across the whole floor. Level it by hand. Gaps against the glass are where soil tends to sneak through later, so push material right into the corners.
3. Fit the siphon tube
This is the step most people skip and later regret. Stand a rigid tube vertically so that its bottom end sits in the drainage layer and its top is hidden in the finished build. Later, a thinner flexible line can go down it to draw the water out. Decide where the tube will be hidden (behind a background, a rock or a plant) before you add soil.
4. Add the mesh barrier
Cut inert screen mesh (such as window screening or fine plastic mesh) a little larger than the floor so it climbs the glass edges slightly. The Wisconsin article suggests window screening on top of the drainage material. Its only job is to keep soil out of the void while letting water through. Cut a neat hole for the siphon tube and make sure no edge leaves a gap.
5. Add the substrate
Spread your substrate over the mesh in a consistent layer, taking care not to push it through at the edges. A bioactive mix with leaf litter and a live cleanup crew goes on top. If you prefer a head start, our aged bioactive vivarium substrate is a live microfauna blend.
6. Water in gently
Add water slowly and watch it pass through. Check the level at the glass to confirm it settles below the mesh. Then leave the build alone for a while before adding plants and animals, and let the tank settle so you know how it behaves.
Removing excess water
A closed drainage layer will fill over time. In a standard glass build, the layer holds misting water until you take it out by hand, so build the habit of checking it. Read the level through the side glass, where the drainage material is visible, and aim to remove water well before it approaches the mesh.
Common ways to remove it:
- A siphon line down the pre-fitted tube, the tidiest option for a planted tank.
- A pipette or turkey baster for small volumes, used through the tube.
- A small aquarium pump or hand pump for faster removal.
- A bulkhead with a drain valve fitted at build stage, for those who plan a more elaborate setup.
Whichever you choose, draw water out slowly and stop before the layer is empty. A layer that holds some water still supports humidity, and you are only trying to keep the level clear of the mesh. How often depends on how much you mist and how big the enclosure is, so use the glass, not the calendar.
Spotting a problem early
The signs that drainage is struggling are usually visible before the frogs are affected:
- Water at or near the mesh when viewed from the side.
- Soil that stays soggy on the surface for days, or a sour smell when you disturb it.
- Fungal growth or pale mould appearing across the substrate and not just on a piece of wood.
- Plants yellowing with roots that look dark and soft.
- Springtails congregating at the surface and not working through the soil.
If you see these, remove water first, reduce misting, and then look at whether the layer is deep enough for how you mist. A viv that seems wet but dries out at the top is a different issue, which we cover in why a viv looks wet but dries too fast. Humidity readings add another layer of confusion, so see our piece on why 80% humidity does not mean your vivarium is humid.
Common drainage mistakes
- Skipping the layer because the tank looks fine in the first weeks. Problems tend to appear once the soil has been saturated for a while.
- Making it too shallow, so the water reaches the mesh quickly.
- Mixing soil into the drainage material, which fills the voids. The mesh must be complete and tucked in at the edges.
- Forgetting the siphon tube and finding you cannot reach the water.
- Never checking the level, then treating a full layer as normal.
- Using unrinsed material, which clogs the mesh with dust.
- Misting without thought, so water arrives faster than it can be removed. Go by what the tank shows you.
Closed enclosures, open systems and paludariums
Most hobby vivariums are closed systems: nothing leaves the tank except by evaporation or by your hand. That makes the siphon tube essential. Some keepers drill the base and plumb a drain, which turns the layer into an open system that drains out, but that is a bigger build and changes how you manage water entirely.
Paludariums, which combine land and a water feature, put more water into the system, so the barrier and headroom matter even more. The principle holds: keep fine substrate out of the void, keep the water level readable, and have a way to remove it.
If you would rather start with a finished build
Getting drainage, substrate and planting right at the same time is a lot for a first enclosure. We build custom bioactive vivariums and also offer aged vivs and complete setups. If you would like to learn the process yourself, our free Bioactive Vivarium Fundamentals course covers the basics of dart frog husbandry.
If you are choosing a ready-made enclosure, our guide on what to look for when buying a bioactive vivarium is a good place to begin.
Our view on drainage
We build and run vivariums in our frog rooms, and our approach to drainage is the same as our approach to most of husbandry: get the basics boringly solid and then leave them alone.
A drainage layer is the foundation of that. It is cheap, it is built once, and it makes every later decision easier, from how heavily you mist to how you plant. We would rather you spend an hour on a tidy layer with a siphon tube than spend months wondering why the soil never seems right.
We also want to be clear that no bioactive enclosure looks after itself. Water levels, humidity, plants and the cleanup crew all need your attention. A well-built drainage layer gives you a calmer routine, not an absent one.
Our own advice is to build with UK conditions and UK-bred frogs in mind, check your water level through the glass, and fix small problems early. If you want a hand with the build, that is what we do.
Frogfather
FAQ
Do bioactive enclosures need a drainage layer?
For a humid, regularly misted dart frog viv, we recommend one. It keeps the lower substrate from becoming waterlogged and gives water somewhere to go below the roots. Some keepers manage without one in drier setups, but it makes a wet tropical enclosure far easier to look after.
What is the best material for a vivarium drainage layer?
Expanded clay balls are the usual choice because they are light, porous and do not break down. Gravel, lava rock and egg-crate panel also work. Whatever you choose, rinse it well and cover it with a mesh barrier.
How do I get water out of a drainage layer?
Fit a vertical tube through the layer when you build, then siphon or pipette water out through it later. A small pump or a drain valve are other options. Check the level through the side glass and remove water before it reaches the mesh.
How do I keep substrate from falling into the drainage layer?
Put a fine mesh barrier over the drainage material and tuck it up the glass at the edges. Leave no gaps, and cut the siphon tube hole neatly. The mesh lets water through but holds soil back.
Sources
Recommended
- Bioactive Terrarium Layers: The Build Order For Dart Frogs
- How To Clean A Vivarium Misting Reservoir
- Bioactive On A Budget: A Realistic Setup That Works
- Unclogging MistKing Nozzles: A Step-by-Step Guide For Optimal Performance In Your Vivarium